How to Use FREE!ship
- an unofficial tutorial -
Part 3: Forming the Hull - Y Axis
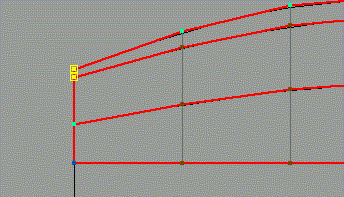
This is what we have until now:
(If you see only a part of it, then just do a right-click in the Plan view window, and select Zoom -> All)
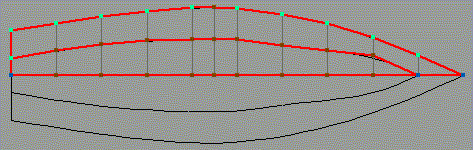
And this is what we want:
Easy. We start at the transom and select the two points that belong to the side panel:
If the selection is too difficult in Plan view (since the two points are close together), just select them in Perspective view or in Profile view where it is much easier.
Now we want to set both points to a beam of 24 inch, as given in Jim's drawing. But FREE!ship measures in feet, so what to do? Just enter the Y value as 0-24, meaning: 0 feet - 24 inches. Hit the return button and - the transom beam is set. Deselect the two points and go on with the next section. Select the two points and enter 0-27.7 as the Y value. In case you should have measurements with 8th of an inch instead of fractional inches, FREE!ship can handle them too: 0-27-5 would mean 0 feet + 27 inches + 5/8 inch.
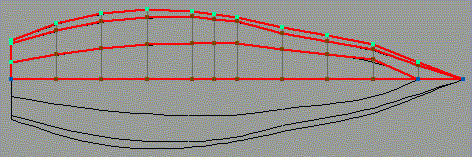
After all sections are set, our boat looks something like
The beam is set, but the bottom panel looks still odd. If Jim would give an offset table for the bottom panel, we could just move those points accordingly and would be done with the Y values. But Jim develops the coordinates for the bottom panel graphically from the Bodyplan view, and this gets literally tricky, if we do it in FREE!ship. But it can be done.
For this we will later want to see only the forward or aft section of the boat. Hiding parts of a design can be achieved with layers, i.e. by hiding layers. So we will have to work with layers now. Layers are groups of faces, so we have to make the faces visible. We select from the menu Visibility -> Interior edges, or - more easy - just click the corresponding button  .
.
Since we are lazy, we let FREE!ship do the work to assign the faces to layers: We choose from the menu Layer -> Auto group, or - more easy - just click the corresponding button
 .
.
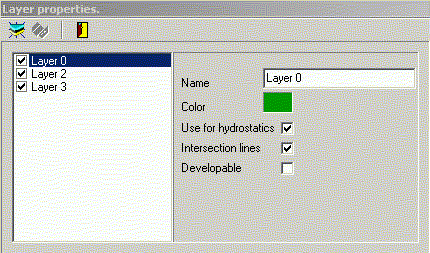
You think, nothing has changed. But it has. Let's see. From the menu we choose Layer -> Dialog, or - more easy - just click the corresponding button  . Yeah, I know, you know that "more easy - just click" sentence already.
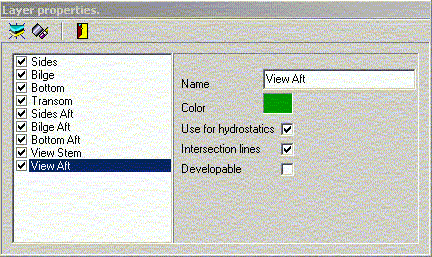
FREE!ship has created two new layers, so that there are three now:
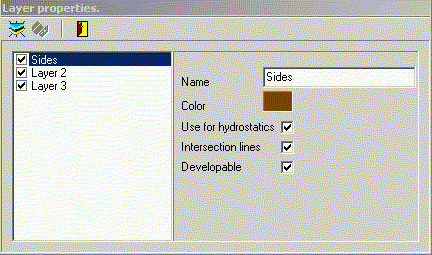
But what are they? We click the checkbox next to Layer 0 and look what happens: The side panels disappear. Since we know now what Layer 0 is, we can give it a better name and choose a more appropriate colour. We also want that FREE!ship shows us later how the the panels should be cut from a straight sheet of plywood. We click therefore the box for Developable.
The same we can do now for the other two layers. Say we call them "Bilge" and "Bottom". All of them form the hull and will be needed for the hydrostatics calculations, so we set all of them to "Use for hydrostatics". So far, so good.
We remember that we will later need one layer for the transom: we just click the button
 to create a new layer. We name it "Transom" and set the other properties similarly like for the other layers.
But now, the tricks start. We'll add three more layers and call them " Sides Aft ", "Bilge Aft", and "Bottom Aft". Colour etc. is not important, since we will delete them later on anyway. We'll add two more layers: "View Stem" and "View Stern".
We are done for now and close this dialog with the botton  .
.
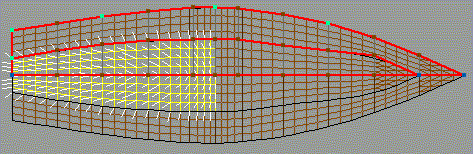
Next, we'll asign the aft part of our panels to the Aft layers. We start with the bottom panel. This is easiest done in Plan view. We click in the areas of the bottom panel until it looks like that:
This is how the Profile view looks now:
We see the yellow lines pointing outward of the hull, in this case downward. Those lines are called "normals" and have to point outwards, otherwise the hydrostatic calculations produce nonsense.
In case (in another design) they would point inward like this:
then we should choose from the menu Face -> Invert, .... (you know what comes) ... or - more easy - just click the corresponding button  .
.
Back to our boat. We have selected the aft faces of the bottom panel.
We assign them now to the layer "Bottom Aft" by choosing that layer in the selection list
 . Important now is - especially if we are working with hidden layers - to do a "Deselect all"!.
Next we repeat those steps with the aft bilge panels (assign to layer "Bilge Aft") and the aft side panels. The side panels are easiest selected in Profile view.
The reason why we did this, was that we are now able to "switch off" the front or aft section of the boat, just as we need. And we will need to do that so that we can edit Y and Z values in Bodyplan view.
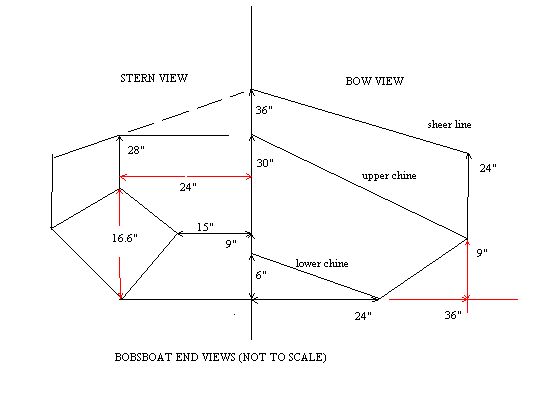
As you see, Jim has one more plan of which we made no use until now:
We will need it now to determine Y and Z values. For this we'll draw this plan as a projection in our design. FREE!ship can do things for which it was not programmed!
We'll start with the Bow view and draw it at X=21, i.e. 1 foot in front of the bow.
We choose from the menu Point -> Add, or - more easy - no, ther is no "more easy". To add a point into empty space is not often needed, so there is no short button.
The new point will be created at coordinates 0,0,0. In Profile view it is easy to see below the transom. We have to select it and then move it where we want to have it. We choose X=21 and keep Y and Z at 0. We add one more point and move it to 21,0-24,0 and one more at 21,0,0-6. Compare it with the Bow view above. Those three points form the projection of the bottom panel. But how can we get the lines that connect those three points? We select all three of them (easiest in Perspective view) and choose from the menu Face -> New, or - more easy - just click the corresponding button  .
.
Looks funny. FREE!ship tries to smoothen the created face at the corners. We don't want that strange look, so we select point by point and make them to Corner points.
Then we go on and create the two missing points for the Bilge panel at 21,0-36,0-9 and at 21,0,0-30. Same story. We select the four points that define the projection of the Bilge panel
and click the button to create a new face. Then we can make points to Corner points, like above. Finally the points that define the chine at 21,0-36,0-24 and at 21,0,0-36. Select the four points, create the face for the side panels. Change the points to Corner points. The edged that define the chines of the Bilge panel have gotten a bit thin and difficult to see, so we select them
and make them crease edges with the button  .
.
Now you do the same with the Stern view, but at X=-1, so that we have the projection 1 foot aft of the transom.
In order to see it better, we move the scroll bar at the bottom of the Perspective view to the right.
This is how it should look like:
In case you have difficulties, this are the coordinates of the points, taken from Jim's Stern View drawing:
Bottom panel: -1,0,0 / -1,0-24,0 (like bow view) / -1,0-15,0-9 / -1,0,0-9
Bilge panel: -1,0-36,0-9 (like bow view) / -1,0-24,0-16.6
Side panel: -1,0-36,0-24 (like bow view) / -1,0-24,0-28
Finally we move the projection of the bow view to the "View Stem" layer, and the projection of the aft view to the "View Aft" layer, like we did it above with the aft parts of the panels.
While we are already at this: You can use the same trick, i.e. creating some faces that are disconnected from the hull as a projection of the plan view. If you'd create them at Z=-1, i.e. below the hull, then they would interfere with hydrostatics calculations. So I suggest that you'd create them at some reasonable distance above the hull.
We will need those projections in part 4.